This user manual describes how to use TCGUI to create traffic control schemas and explains its features. For installation instructions and requirements please refer to the "TCGUI Installation manual" instead.
The Visual Traffic Control Configurator project (TCGUI) provides a tool for designing traffic control structure of Linux systems using the iproute2 networking subsystem. Created configuration schemas keep information about the structure and attributes of shaped interfaces, queuing disciplines, filters and classes. Specifications of supported traffic control objects, their features, attributes and usage are held in separate XML definition files. TCGUI allows exporting the configuration into a shell script, that sets the traffic control configuration of the kernel. Generated scripts are intended to be easy to understand and easy to modify - that makes them independent of TCGUI itself.
Anyone, who is not familiar with traffic control under Linux OS, should read lartc howto (chapter 9) first. This manual does not contain such information and is intended for those already familiar with tc.
After successful installation, the TCGUI can be started by running the startup script, which can be found in the installation directory. Its name differs depending on the operating system. Under MS Windows it is called "tcgui.bat" and under Linux "tcgui.sh". By executing the script, the TCGUI starts up and an empty main window appears.
The empty main window, which appears after every TCGUI start, should look like this (with slight differences across various OS or window managers):
![]()
Most actions can be performed using the toolbar and corresponding buttons at the top of the main window. Alternatively, a right click context menu may be used. The actions are described in detail below.
|
Toolbar icon |
Description of performed action |
|
|
New: Erases whole schema, so main window is empty like after startup again. The action can be undone with Undo button. |
|
|
Open: Opens existing schema from saved XML file and restores its contents, so it can be modified. |
|
|
Save: Saves snapshot of current schema into XML file, so it can be later reopened and restored. |
|
|
Save as: Same as save, but always asks for new file name into which to save the schema. |
|
|
Test Export: Checks whether the current schema can be exported without errors. If any error is found, it is reported to the user, so it can be easily corrected. |
|
|
Export: Exports the current schema in format of executable script, which will after execution set the traffic control structures on compatible Linux OS in appropriate way. |
|
|
Undo: Reverts the last undoable action performed. |
|
|
Redo: Repeats the last action which was undone. |
|
|
Device: Fill in the name of the device to which this schema belongs (ie. eth0) |
|
|
Add classless qdisc: The mouse pointer changes to icon representing classless qdisc. Then it should be positioned on desired place in current schema and after clicking the buton, new classless qdisc will be added there. |
|
|
Add classful qdisc: Same as with classless qdisc, but this time a new classful qdisc will be created. |
|
|
Add class qdisc: Same as with classless qdisc, but this time a new class will be created. |
|
|
Add filter: Same as with classless qdisc, but this time a new filter will be created. |
|
|
Add filter element: Same as with classless qdisc, but this time a new filter element will be created. |
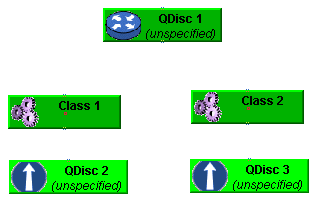
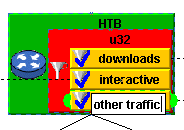
With use of the above described buttons or right click context menus, the objects from which the schema will be built can be created. All objects then have to be correctly interconnected or placed inside their appropriate containers. Recommended approach is to create qdiscs and classes first and place them to desired locations like on this example:
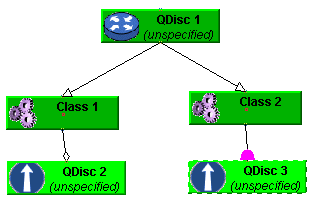
Then it is best to connect them with edges, by selecting one of the objects and clicking and dragging the "edge drag icon", which appears after selecting the object. The result could look like this (notice the "edge drag icon", that is visible for the selected "QDisc 3"):
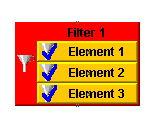
Next step should be creation of filters and filter elements. First create the necessary filters and the filter elements. Place the elements inside filters by dragging and dropping them inside. Result will be similar to this:
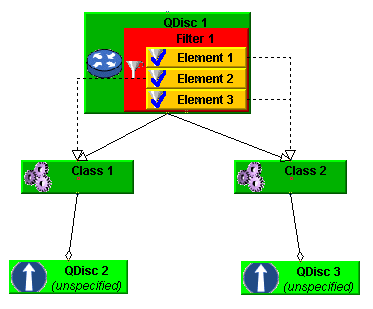
Finally place the filter inside a classful qdisc or class and for each filter element set its match target (flowid) by creating edge from that filter element to its target in similar way as when connecting classes and qdiscs. The schema may now look like this:
After creating the schema structure, most visible labels can be edited by double clicking on them:
This is not necessary, but highly recommended, because both - the resulting schema and the exported script - will be much more readable.
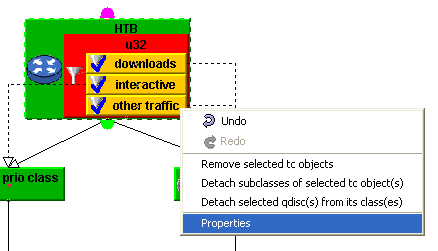
Finally it is required to set the properties for all the objects. This can be done by right clicking on any of the objects and selecting properties from a context menu:
A window like this should appear:
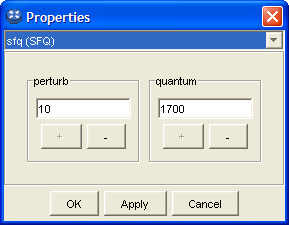
The design will differ for different objects. The example windows above contains properties of classless qdisc SFQ.
When the schema is completed, it can be saved in the XML format for later use. It can be also exported to the form of an executable script for Linux OS. For all this actions use appropriate buttons from the toolbar, described at the beginning of this manual.
(written by pavnovak, last change 5. 1. 2004)